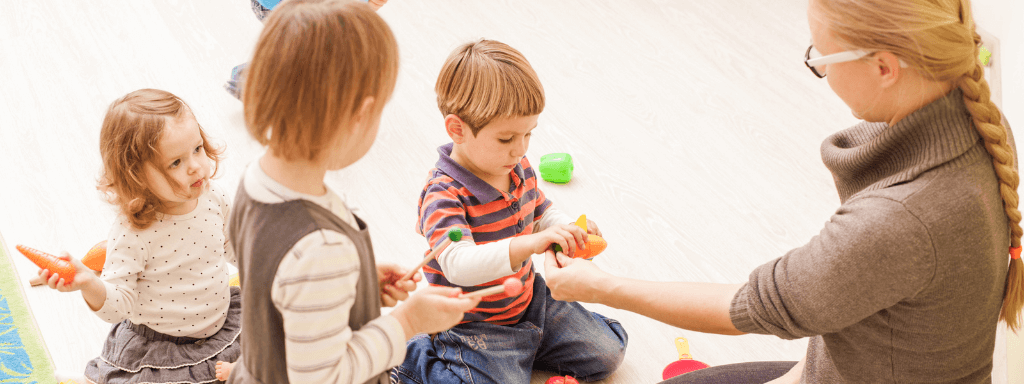
Curious about running your baby and toddler classes online?
Happity has always worked 100% remotely – we’ve tested all the online tools as a team, and we understand some of the challenges that come with working online.
We’ve been busy trialling the technology and working with class providers to create an online experience equivalent to ‘real life’ classes. Below is a guide on how we would suggest you set up with Zoom and then integrate with the Happity system.
If you want to get going quickly, we have a “Quick Set Up” section for you to get started immediately. But, if you would like a bit of guidance on how to use Zoom to run a session, then we have more info below.
We hope it’s useful!
Quick Set Up For Happity@Home
If you’re not yet a Happity Member please register here.
If / once you’re a Happity member, you need to set up zoom, set up regular classes in zoom, then hook these up to the Happity booking system.
Working together as a sector to reach more parents
For parents new to video conferencing, there’s going to be a bit of a challenge. It’s all too tempting to switch off your video and not show your face to the world!
Once parents have attended one class, they’ll feel safer and more comfortable attending another that uses the same technology – because they’ll know exactly what to expect and how to use their settings.
In fact – we’ve also written a blog for parents which you can share with your customers to help them navigate their settings – it’s been written to be relevant for anyone hosting classes on Zoom.
Any bookings made for virtual classes via Happity will automatically be sent these instructions in their email confirmation. We’ll also send them the link for the class – both upon booking, and 15 minutes before the class starts.
Getting started with Zoom
It’s really easy to get set up with Zoom and start using it in the simplest possible way – though we do have some tips and tricks for enhancing the experience!
When you sign up for Zoom, the FREE version allows you to host classes up to 40 minutes long. If you need to host a longer session, the pro version is c. £14 per month once tax is included. Bear in mind that with children at home, you won’t have a 100% captive audience so a slightly shorter session than normal may be preferable anyway.
Once you have signed up and installed the app, you can literally click start a ‘new meeting’ – send this link to your attendees and you’re good to go!
Although Zoom technically allows you to host up to 100 participants, we really recommend keeping your classes small and interactive if this is how you would do it in real life.
Running your class through Zoom
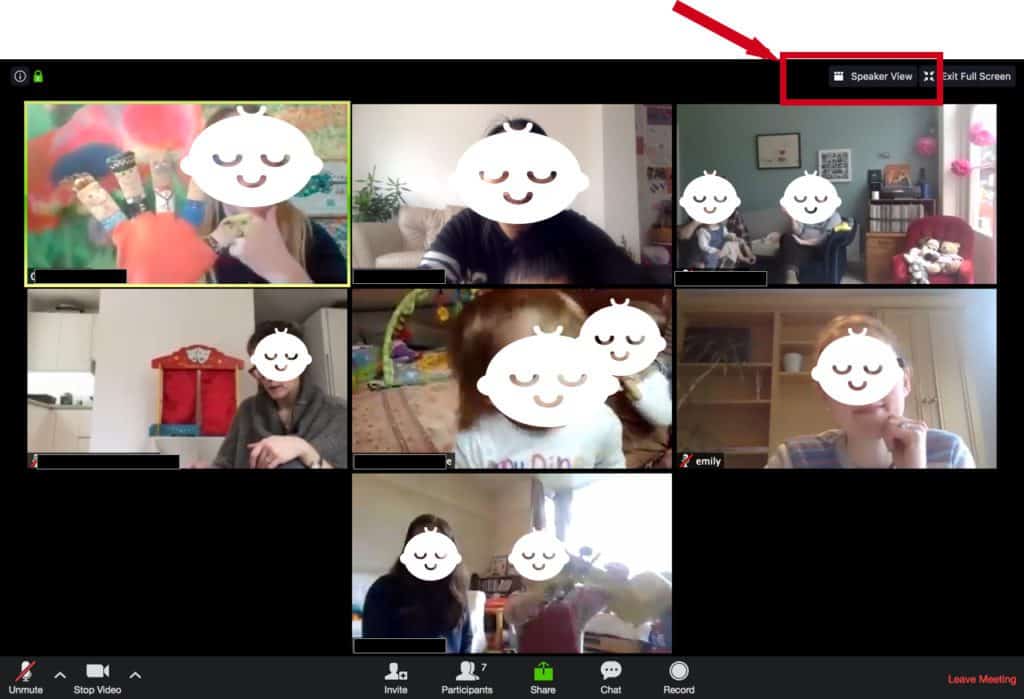
Zoom lets you see all of your participants on screen at once, using the ‘Gallery View’. Our booking emails also asks parents to add their children’s names to the screen (blanked out below) so that you can interact directly with them during the session. Many kids are used to speaking to grandparents through technology, and they respond so well when you talk to them and know that you can see them. This is where the value of a live class really comes into it’s own – it’s so much better than watching something on YouTube!
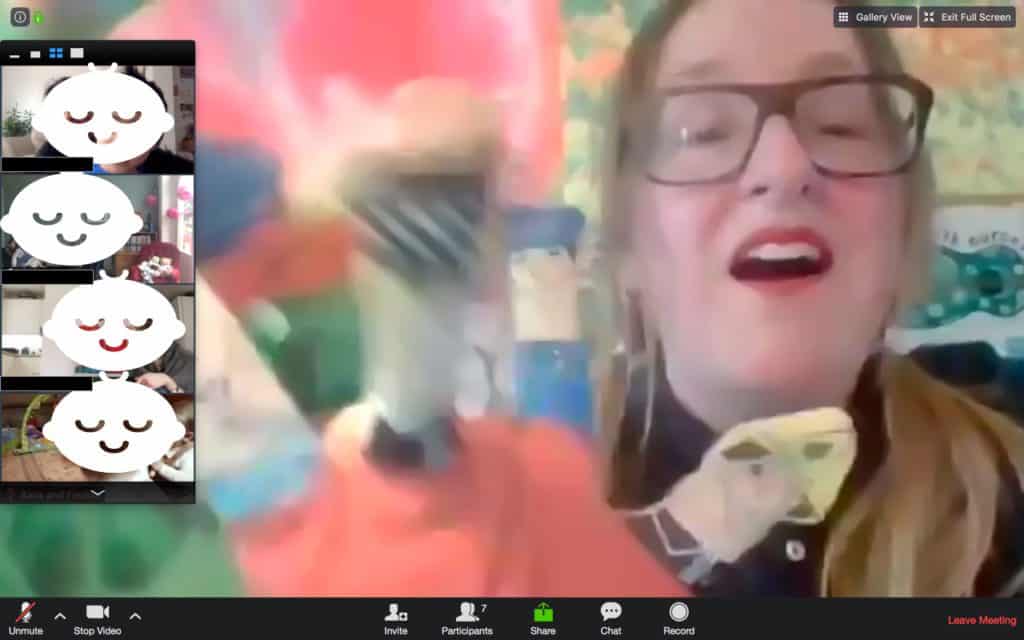
For parents, it will look more like this:
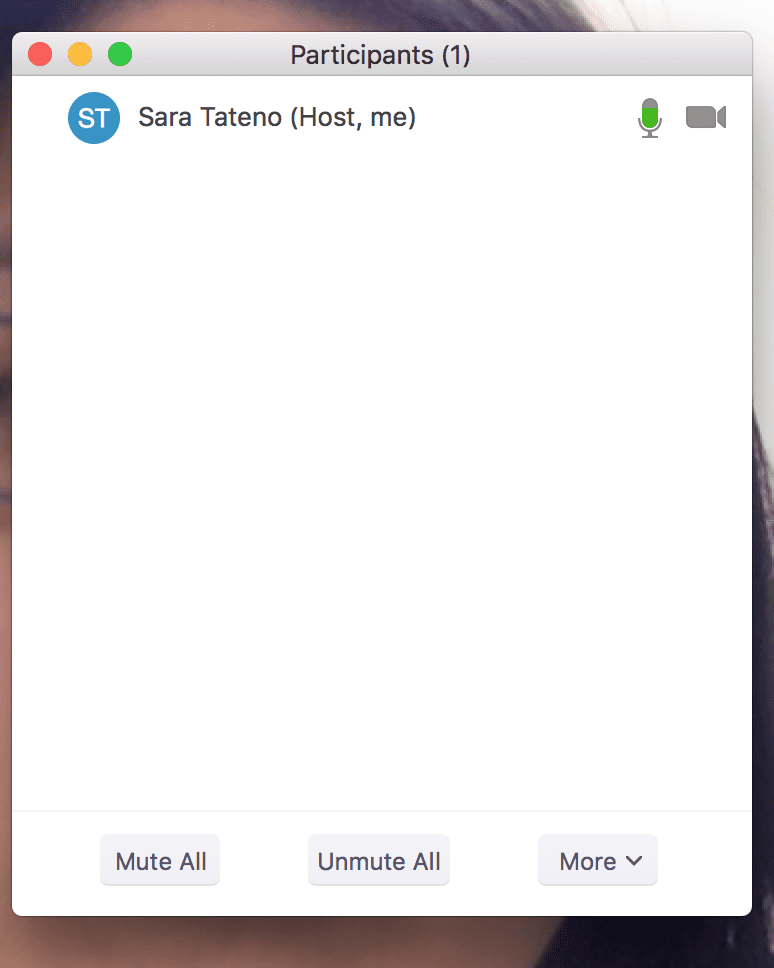
During the class, it’s then really important that you use the MUTE ALL button that can be found in the ‘Participants’ window.
Your customers will not be able to hear you clearly unless you do this – but do encourage your customers to unmute themselves in between songs and get involved!!
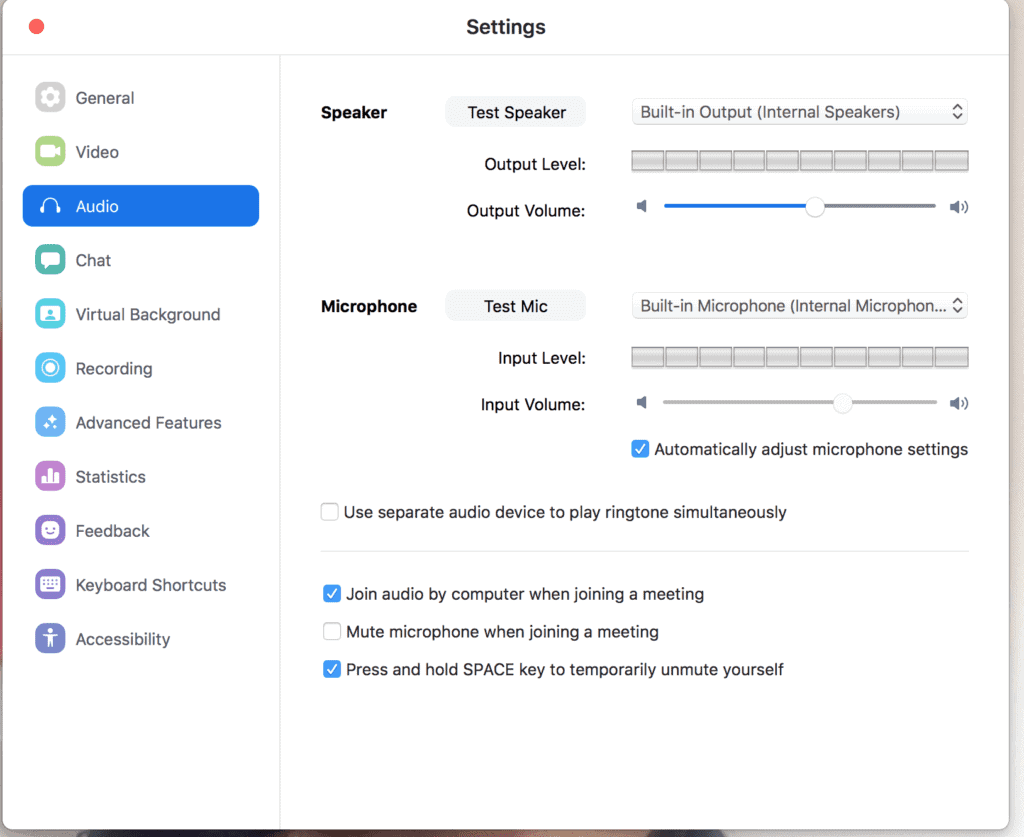
Top Tip – You can also increase the volume of yourself vs. the other participants in the room. Click on the up arrow ” ^ ” shown next to the mute button in the bottom left hand corner, and choose ‘Audio Settings…’
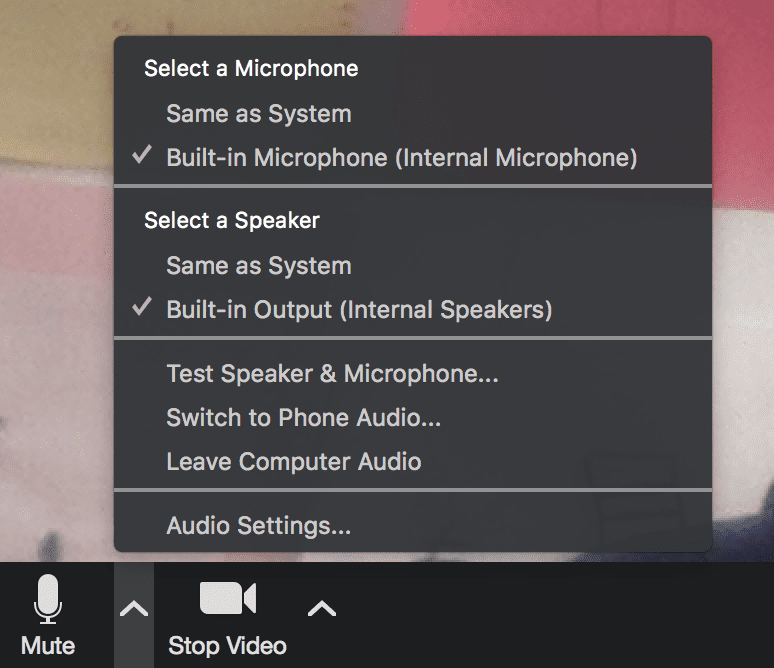
Untick the ‘Automatically adjust microphone settings’ box, increase your ‘input volume’, and then tick ‘Automatically adjust microphone settings’ again. This will ensure that your volume is generally louder – whilst also automatically adjusting so that you don’t accidentally deafen anyone. 😅 It’s also great to have this setting, as you can then have the occasional song where everyone unmutes and joins in together. Zoom does a nifty thing of jumping around to display whoever is singing loudest, making for a lovely interactive session!
Equipment
You don’t really need much equipment to get started with your online classes if you have a device with a microphone and camera! However, your biggest challenge with this is going to be having a consistent internet connection, so if you are using a computer DO get a physical wire to plug into your internet, instead of relying on WiFi. Also, having other members of the house streaming Netflix whilst you’re broadcasting a class is a definite no-go!
Setting up your space to make it look good makes it feel a bit more special for your customers and sets you apart from the other participants. Display your logo and have some bright-coloured props! Put up a backdrop if you can and make it look unique to you. (If you’re technically inclined, Zoom also allows the option to add a virtual background too!)
On sound – test it out with someone friendly, but generally, there is no need to sing through a speaker if you’re in a quiet space and have got a reasonable microphone (and turn up your settings as above).
A Quick Note on Pricing Your Classes
We suggest keeping your prices similar to your normal classes, but consider setting a price for the whole family to attend together instead. Each family will still only take up 1 square of your screen in Gallery View, so unlike in a physical venue, having more children to a household won’t affect the quality of the class delivery for everyone else.
Making The Admin Manageable
Using Zoom at it’s simplest is easy peasy – but using it in this way is not quite so manageable when it comes to the admin side! Using the above method, you won’t have a room ID until you start the meeting – you’ll have to make sure to get this link over to each of your customers in time for the class to start each week, and support your customers with changing their settings when they log in.
Luckily there are some great settings in Zoom you can use to make this more manageable!
Schedule a Regular ‘Room’ for Your Online Baby Classes
By setting up a fixed weekly link for your classes, you’ll be able to give your customers advance notice and reduce last-minute panic! This will also help your regular customers access your classes from week to week.
By doing this, you can also make use of some of the more advanced features – like adding your logo to the screen, automatically making sure that cameras are switched on, automatically muting participants on entry (if you want to), and using the waiting room feature so that you can check your registers.
How to set up ‘rooms’ for your Online Baby Classes
1) Go to Zoom.us – preferably on a desktop or tablet
2) Click on ‘My Account’
3) Choose ‘Meetings’ – ‘Schedule a New Meeting’

4) Use your class name and select ‘recurring meeting’. Then in the drop down select “no fixed time”.
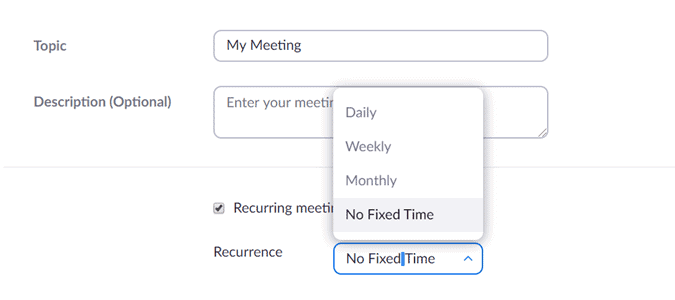
This creates a unique Zoom link for your classes.
5) Untick ‘Require meeting password’
6) Choose Video Host – ON, Participant – ON
7) Audio – Both

8) Meeting options – Tick ‘enable waiting room’ – this will allow you to view the names of your participants before letting them in and allow you to check your register before starting each class. By using the Waiting Room feature, you can also add your own logo to Zoom and make it look fancy when people click the link and are waiting for the class to start!
9) Click ‘Save’
10) IMPORTANT: Make a note of your Zoom URL for this particular time slot! You need it to put into the Happity booking system as it will email this link to participants when they book, and again 10 minutes before the start of each class, asking them to join – it will also email you with the link and a list of your customers too, so that you can start hosting it.
Taking Bookings & Promoting Your Online Baby Classes
If you’ve been used to taking cash on the door, you’ll now need to find a way of taking online payments. It’s possible to take free transfers via Paypal, but you’ll need to track your registers manually – and make sure parents choose the ‘friends & family’ option to avoid the hefty fees.
If you’ve chosen to use Zoom to host your classes virtually, you can join the ‘Happity@Home’ programme. Our features will make it easy for you to manage your registers, including sales reports, email confirmations and reminders, teacher logins, and the ability to contact all your customers for any given class via email or text. We’ll also help you build your email marketing list.
Anyone sharing Happity pages can tag @HappityApp and we will share on our stories to get people booking!
Happity: Created with baby class providers in mind!
If you are looking for ease and a listing/booking service that’s catered specifically to you (busy parents and small business owners) then you’ve found the right blog page.
It’s free to list with Happity, and you can offer all sorts of ticket options through our site. Though we also offer cost-effective membership for when your baby class needs an extra boost in its marketing or if you would like access to our provider-catered booking system.
Get your classes seen by thousands of parents today
If you liked this post, you may also like:
7 Easy Steps To Build A Click-Worthy Newsletter For Your Baby Classes
4 crucial questions to ask before marketing your baby class
16 Social Media Content Ideas For Your Baby & Toddler Classes