Don’t know where to start when it comes to your first Instagram Reel?
We get it. You already have so many things you need to do when running your small biz. Trying to be a social media manager too is a lot!
But if you want to improve your marketing, then social media (and reels in particular) are a great, cost-efficient way to get more people viewing your page. And the truth is, content creation can be pretty fun once you get into the swing of it.
We’ve created this guide and covered all have tried to cover the process as thoroughly as possible. If you’re completely new to creating reels, then this guide is for you. Try creating a reel while you read!
(We have also added some extra tips on how you can grow beyond the basics at the end. We hope they help!)
The Basics: 3 Easy Steps To Creating An Instagram Reel
1. Creating Footage
There are two ways you can record footage for your reel. Either by recording through the Instagram camera mode, or by uploading already existing videos on your phone.
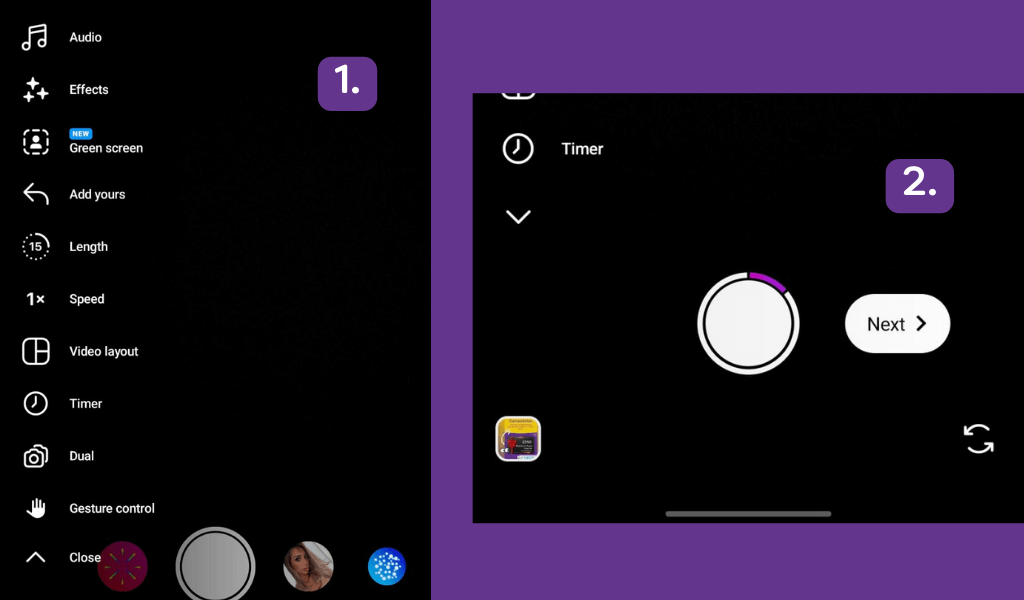
There are different benefits for each. If you want to create a reel from content you filmed in your classes then this function makes it easy to quickly import footage to use. Whereas if you wanted to craft a meme or use a format trending on Instagram, then you can mime, set timers, choose how long you want the video to be, and more using the Instagram Reel editor. (Check image 1 in the graphic below to view all the options).
If you prefer to upload a video, tap on the gallery icon in the bottom left corner and select the video you want to use.
To record a new video, tap the record button and tap again when you’re done. You will notice after you’ve recorded one clip, a purple line will start to move around the record button. This is a good indicator as to how much left you can record (check image 2 in the graphic below to see an example).
Once you’ve recorded as much as you want to record, hit the next button to move on to the editor.
Not sure what content to create? Here are 16 Social Media Ideas For Baby Class Providers
2. Editing Your Video
Once you hit next, you’ll be taken through to the Instagram Reel editor.
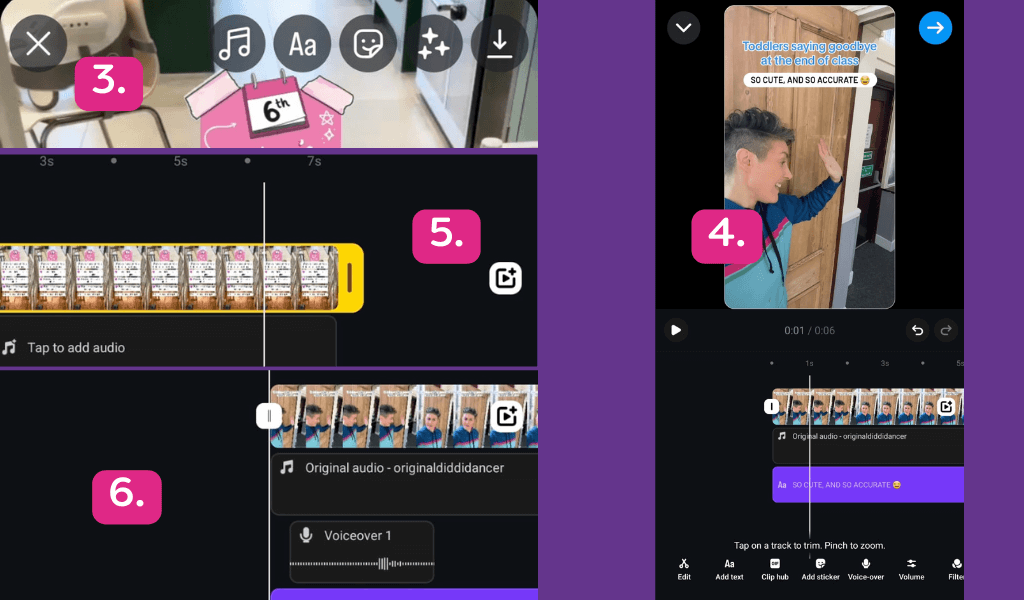
When the video is on fullscreen, you will see some options that you’ve probably seen when posting to your stories in the past (See image 3 in the graphic below).
This includes:
- A music symbol (where you can add audio if you haven’t added any yet)
- An option that says ‘Aa’ (where you can add text on your reel).
- A sticker button (where you can add subtitles, stickers and more)
- Three sparkles (where you can add effects)
- A downward pointing arrow (where you can save your reel to your phone)
In the bottom left corner of this screen, you will see a button that says ‘edit video’. Tap on this, and you will be taken to their more detailed editor (full view in image 4 below). From here, you can see your audio tracks, your video footage, any text you’ve added to the reel, and all of the timings each element has on your video.
You can adjust each of these by tapping on one of the elements (where it will highlight in a yellow outline) and then either pressing one of the options in the bottom menu like ‘split’, or dragging the end tabs on your clips to make your clips either longer or shorter (example in image 5 in the graphic below).
If you want to use more than one video for your reel, you can add extra clips to your reel, by pressing the white square that has a play button and a ‘+’ on it (also in image 5).
Another feature that might come in handy for you when you’re posting reels about your classes is the ‘voice-over’ option.
There, you can record (in your own words) a bit of info about what you do in your classes and any other information that you would like to share with your audience! You can combine voice-over with other audio (image 6 in graphic below), adjusting the volume on the ‘volume’ button in the bottom menu.
Once you’ve edited your video, and you’re happy with how it plays out, hit the big blue arrow in the top right corner.
NOTE: Don’t worry if you think you might need to edit it again or come back to the editor later on. You can tap edit or save draft on the next page to come back to this screen.
3. Adding Copy & Posting
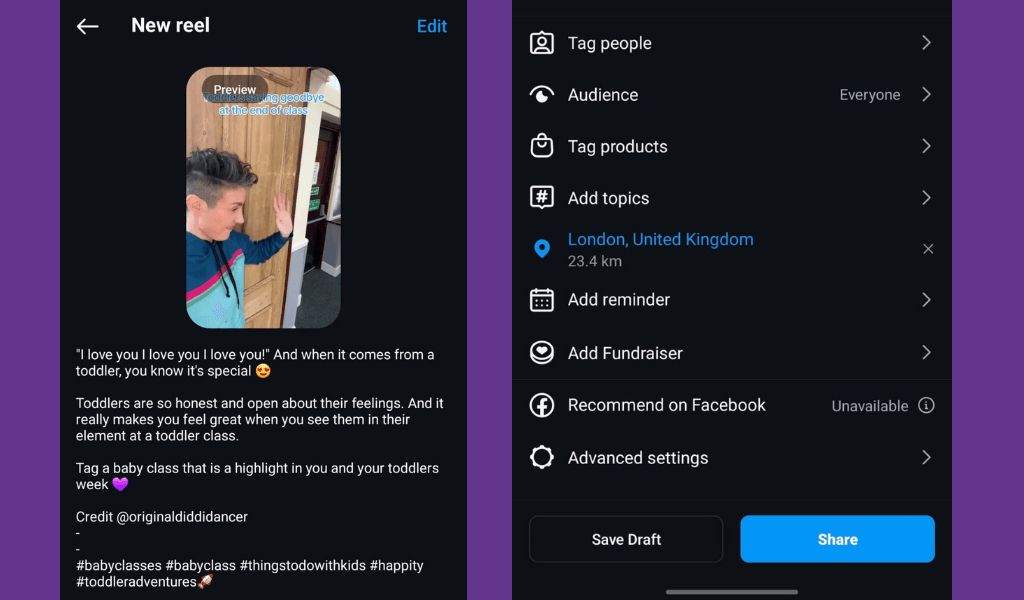
The last step of creating a reel is by adding copy to your description ready for posting.
Keep in mind that on the reel media player, your audience will only initially be able to see the first line of your copy. So that means you want to start your copy with a quick one-line that compliments your reel or gives viewers a call to action (something for them to comment on your reel).
This doesn’t mean that you can’t include a longer description. People can tap on your description and read more. Explore this in the reels tab on Instagram.
Remember to also include a few hashtags to get that extra reach. We recommend around 5 different hashtags. Remember, Instagram uses these to predict who to show your reel to. They aren’t a magic solution to gain tons of views, but they help the algorithm. Think of them like topics that will help Instagram figure out who you are trying to reach and who your target audience is.
Before you share your reel, it’s a good idea to spend some time playing with some of these extra settings too. Tag a few people, add your location to be recommended to users in the area, and see if any other settings might help.
Finished? Checked everything over? Hit that big blue share button at the bottom of your screen. And you’ve done it! You’ll see it on your feed moments later.
Blasting Off: Top Ways To Regularly Post And Create Content
Browse Through The Reels Tab For Inspiration
Don’t make yourself a stranger with the reel tab on your Instagram feed, in here you’ll be able to find easy-to-make reels that will get you a quick jump in views. You’ll also be able to use this tab to get inspired and figure out what kind of content you could also make. (Day in the Life, comedy, baby facts, slice of life etc.)
Trending Audio
When you’re scrolling through reels on Instagram, keep a careful ear out. There’s going to be audio that you hear over and over. That means that audio is likely trending. You’ll want to save that and use it for something. (Not sure how to save audio? Head over to the comments of this post to find a speedy video tutorial)
Jump On Trends
When it comes to reels, the name of the game is to jump on trends. You’ll start to notice a lot of repetition while you’re browsing through other people’s reels. Social Media is fast-paced, and much like our little class attendees, we love repetition when we’re scrolling. When you notice a trend repeating over and over, consider jumping on it. You may see a spike in views if you do.
Include Hashtags (But Don’t Go Overboard)
Hashtags are a great way to get your reels seen by your target audience. Think of it like you are telling Instagram what topics your reel is covering. From there, Instagram will figure out who to show your reel to.
It’s a useful way to reach more people, but you don’t want to overstuff a ton of hashtags. if you do, then Instagram might think your post is spam and blacklist it from people. We recommend using around 5 of them.
Use External Apps (e.g. Capcut)
When you’re scrolling through reels, you might start to notice a few reels that have clips from popular media (including tv shows, movies, news, interviews etc.) greenscreened on top of other videos or images (example here). These have been made using the app Capcut. This is a great way of accessing ready-made templates (for free) that you can create new memes from. Perfect for people who don’t always have the time to film a full reel.
Remix
If you’ve not heard of the ‘Remix’ feature before, then (in short) this is reposting someone else’s reel with your caption on it. It’s the same as when you hit retweet on X, or share to your feed on Facebook. This is a nice quick way to generate reel content without having to film anything. A perfect solution when you’re just too busy. When you’re watching a reel, tap the 3 dots in the bottom right corner. If the original poster has the option available, then you can tap remix and then make this reel appear on your feed too.
Still have questions about how to create reels?
Our Social Media Manager, Leanne, recently posted her top tips in our Facebook Class Provider Group and invited anyone to ask anything. Hop over there and ask away
Happity: Created with baby class providers in mind!
If you are looking for ease and a listing/booking service that’s catered specifically to you (busy parents and small business owners) then you’ve found the right blog page.
It’s free to list with Happity, and you can offer all sorts of ticket options through our site. Though we also offer cost-effective membership for when your baby class needs an extra boost in its marketing or if you would like access to our provider-catered booking system.

Get your classes seen by thousands of parents today
If you liked this post, you may also like:
16 Social Media Content Ideas For Your Baby & Toddler Classes
7 Easy Steps To Build A Click-Worthy Newsletter For Your Baby Classes